graphic design - music - photography


The posts are based on researches, the lecturer's materials, and my opinions.
Sorry if I made any kind of mistakes.

Welcome!
Showing posts with label Drawing Technique. Show all posts

Monday, 7 April 2014

Draw with Charcoal = Fuuuun

Thursday, June 4th 2013

Today was so fuuun, we gonna draw people with charcoal. The steps are:

1) choose a picture you gonna draw and make some grids (mine 1x1 cm)

2) make a grid on your paper which you choose to draw with charcoal (mine 6x6)

3) start to draw! Stay focus on one square not the whole image 

Doneee ;D

In the end sir angga gives us 2 homeworks. 1st: draw with charcoal (that one i just finnished) 2nd: draw 5 things in your kitchen hoho like thisss

Wednesday, 2 October 2013

Drawing Techniques (Final Week!)

Monday, september 30th 2013

Today was the presentation daaayy. Whoaa at the first time, i felt sooo nervous but it suddenly gone! I tried to encourage myself to be the 1st one who presented my artwork. 

Alhamdulillah i've done the 1st day. Sir Angga'a advice was i've to arrange and plan the presentation. For example i've to tell the step first then the result. What i did today was telling the result first then the step.

I've learnt alot today from the presentation. ;)

Sunday, 29 September 2013

Drawing techniques (week 12)

Monday, september 23rd 2013

Today we continued our time magazine cover. Mine is only adding some texts, white border, and the barcode. After that we we're asked to print it so we can see the printed colour. 
Using adobe illustrator

Mas Rama helps us to print

At the first 4th times, we have ink problem so the result was different with the real file.
Tadaaa finally
Me with my Time Magz cover :) finally

Friday, 20 September 2013

QC Time Magazine: continuing the magazine

Wednesday, september 19th 2013

Me and berta met sir Angga to teach us how to combine all of the things. I want to combine all of my images:
+ the frame

So i used photoshop to combine all pf the images and editing the contrast, brightness, saturation, and everything:

To combine it with the word "TIME" that i've traced on adobe illustration, i must saved the image into JPEG format then open it on Ai. 

And tadaaa:

HIHI done!!!


Monday, 16 September 2013

Time Magazine: Self Portrait

Monday, september 16th 2013

Today was fun! I met my favourite drawing equipment! It is the pastel crayon! Sorry sir Angga i borrowed yours ;-p
Wish i could buy this pastels!!! (As soon as possible) cuz i really loves it!! It's easy to blend and i just love it!!!!!!❤

I used that for making a self portrait of me :p. The first step was tracing my face with tracing paper:
Left-right: using sharpie marker - using technical pencil.

Then i copied it into 3 copies:

Voila! It's time for colouring with pastels!!!!!
Decide the dark part first then blend it with your hand.


Compare it with the original image!

AND VOILA HERE IS MY PRECIOUS :'* 
So glad that i could. Make. It. Like. That. Omg!!! HEHEHEHE
The comparison 

Q:
1. Why my eyes are direct to the right?
2. Why i use yellow as the background?

A:
1. Because i am the kind of person who always look ahead. I'm not a kind of person who fixated on the past. And my mindset is positive. Bismillah HEHEHEH πŸ˜„πŸ˜„πŸ˜„
2. Yellow is so me. Yellow defines happy, cheerful, bright, fun, etc. hehehe and i (my friends also) think i'm that kind of person :p


I FEEL SO YELLOW TODAY HEHEHE
❤❤Adia

Monday, 26 August 2013

Drawing Techniques (week 8, 9, 10)

Week 8: Monday, August 26th 2013

Today I learnt something new... It's Adobe Illustrator!!! Sir Angga taught us how to trace the word "TIME" on TIME magazine cover. But before that he asked me about the concept of my TIME Magazine. So this is the fixed concept:


Then I was searching some inspirations for the rubik, headline, and the magazine cover


After that we learnt about how to trace the word TIME from TIME Magazine using Adobe Illustrator.


Week 9: monday, september 2nd 2013

Today was quiet not productive because i didn't bring the material. So today, i only  decide what materials needed and the picture of mine. For me, i think i am a cheerful person HAHA so i posed like a happy people. But sir angga helps me to edit my photo on adobe photoshop then print it. 

But the bad wifi was wasting my time!!!! Cause i have to send the edited pic to the library then print it but the file's size way to big (around 25-40mb each photo) so today i only print it without tracing the photo. :( :( 


Week 10: monday, september 9th 2013

Today i've changed my mind to change my photo into normal photo (not the rubik one). Because i think its way too complicated that may confusing people.

Materials needed:
• shell
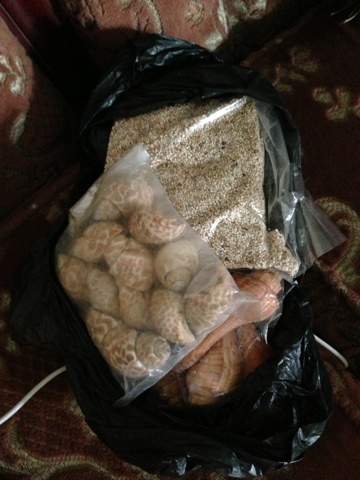
• sand
• colourful flowers
• leaf

Why i choose that materials?? Because things there are my favourite things! Hehe i love flowers, beach, and nature. It also my dream to visit that kind of places. It also represent me, i am a relax person HE HE. Why i choose the bright colours? Because i thing i am a cheerful person, i love being happy, and my friend thinks that i always smiling.

First of all, i have to buy the materials.
This store the aquarium store, Tirta Kumala. Its located in Jl. Margoda Raya, Depok. This is a place that i was bought the shell and the sand:

@Rp. 5.000

Then i picked a bunch of frangipani flower in front of my house and some leafs on my grandma's house

Frangipani tree in front of my house (the right one)


Then i bought 3 kind of flowers (that also has the different colour) in Tebet near SMAN 26. 


HAHA at the first time, the Mas-Mas gave me a price @Rp. 15.000 but in the end after the "tawar menawar" process, i got @Rp. 10.000 ;-p so I only pay Rp. 30.000 for 3 bundles of flower

 ME WITH THE FLOWERSSSS ❤❤❤


The materials

Then i had some experiments with my nΓΌ friendssss, they are:
• flowers

• shells

• leaves

After having the experiments, i started to put the meterials on their position:

I use a2 paper because it's easier to make the poster on the big paper. I started to draw the sketch.


I decided to start making the flower part first, because it can be withered.


Tadaaaaa! HE HE done ;-) the next step is making my portrait by using the grid method. Wish me luck, will be posting soon!!!

❤Adia