on Monday, November 4th 2013 we started to use our camera. Mine is Canon 60D
First, sir Pongky told us that we have to know our camera well.
Steps how to make a good picture are:
1.Setting white balance
- White balance is camera setting that adjusts for lighting in order to make white objects appear white in photos. So its about the temperature.
- You want your photo looks more red or blue (warm and cool temperature)


2. Setting image file
- its about how big are we going to print the picture.
- RAW is the biggest file.
3. Setting ISO
- <<ISO: sharper and brighter picture. this function is use on the dark condition.
- ISO>>: less-sharper (more pixelated) and darker picture. this function is use on the bright condition.
4. Exposure mode

SHUTTER SPEED
What is Shutter Speed?
Shutter speed is the amount of time that the shutter is open.
- Shutter speed is measured in second - The bigger the denominator, the faster the speed (i.e. 1/1000 is faster than 1/30)
- In most case, you'll probably be using shutter speeds of 1/60th of a second or faster - cause anything is slower than this is difficult to use without getting camera shake (that cause blur)
- Slow shutter speed (anything slower than 1/60) need to use tripod
- Shutter speed on your camera will usually double (approximately) with each setting - for example 1/500, 1/250, 1/125, 1/60, 1/30, 1/15, 1/8 etc
- Some camera has very slow shutter speeds - for example 1 sec, 10 sec, 30 sec, etc. These are used in very low light situations
- If you want to choose what shutter speed to use, you should ask yourself what effect do you want - you have the coice either freezing the movement (looks still) or intentionally blur (giving a sense of movement
- To freeze movement in an image - faster shutter speed or slower shutter speed (movement blur)
- Motion is not always bad - There are times when motion is good. Example taking photo of a waterfall (want to show how fast the water is flowing), a racing car (wanna give a feeling of speed), a star scape. You need to use tripod
- Focal length and shutter speed - longer focal lengths will accentuate the amount of camera shake so you'll need to choose a faster shutter speed
source: http://digital-photography-school.com/shutter-speed
1. Fast shutter speed
- freeze image
- <<1/60 : fast
- blur image
- 1/60>> : slow


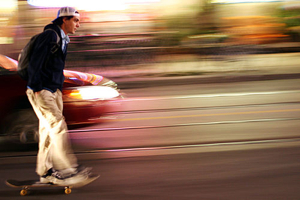
3. Panning
- You move the camera (following the object) while the object is moving
- Using slow shutter speed

APERTURE (DEPTH OF FIELD)
What is Aperture?
- Aperture is the size of the opening in the lens when a picture is taken
- Aperture is measured in f-stops (i.e. f/2.8, f/4, f/5.6, f/8, etc)
- f/2.8 is much larger aperture than f/22
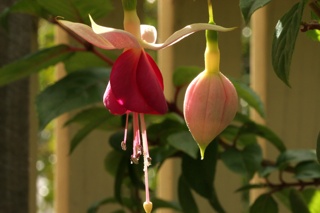
Depth of Field and Aperture
- DOF is that amount of your shot that will be in focus
- Large DOF : most of your image will be in focus whether it's close to your camera or far away (i.e. f/22)
- Small (shallow) DOF : only part of the image will be in focus and threst will be fuzzy (i.e. f/4.5)
 |
| using f/22 |
 |
| using f/2.8 |
"get your camera out and do some experimenting is the best way to get your head around aperture"
source: http://digital-photography-school.com/aperture
1. Small F (e.g f/2)
- Is for taking less-light photo
- the smaller the aperture is, the bigger the hole's open
2. Larger F (e.g f/32)
- Is for taking lots of light photo
- the bigger the aperture is, the smaller the hole's open


LENS
- Wide Lens
- Normal Lens
- Tele Lens
- Macro Lens
IMPORTANT DECISION WHEN TAKING PICTURE
- Composition
- Focusing
- See where metering indicator falls
- See your light meter indicator (be careful of error signal)